The Boosted Alerts come in two flavors. There is a Paid version and a Free version. Both still excellent sections if you are looking for a minimal train / alert / event list style alert package. In the guide below, we will be going over how to setup the Paid version of the alerts.
Set-up Video
Streamlabs Set-up
In your downloaded files, open the folder to the widget you would like to install.
- Click the Quick Setup link to begin installing the Widget.
- If you’d like, choose “Create Widget Theme” and name it something appropriate such as package name. The import link will only override your selected widget. This means you can combine these with any other scene collection/widgets you’ve made in Streamlabs. If you want to save your old widgets, it’s highly recommended you create the new profile.
- Select “Use” for the profile you want to import into.
- The page will automatically take you to the Widget settings for the widget you just imported.
- Click on the “Copy” button next to the unique URL.
- Paste this URL as a “Browser Source” in your streaming software.
Once you’ve added this into your streaming software, test the widget to make sure they’re working properly.
StreamElements Set-up
In your downloaded files, open up the StreamElements folder.
- Head over to StreamElements.com and ensure you’re logged in to the correct account.
- Double click the StreamElements Quick Setup link for the widget you want to import.
- This link will automatically open up the StreamElements website and begin the import.
- You should get a notification at the top of the StreamElements website stating the import was successful.
- Head over to "Streaming Tools" then “My Overlays”.
- You should now find the imported widget named after the pack they are from.
- Click on the “Launch Overlay” to get the URL for your alerts.
- Paste this URL as a “Browser Source” in your streaming software.
Once you’ve added this into your streaming software, test the widget to make sure they’re working properly.
The Streamelements links are specific to your platform. You can only use the Twitch link for Twitch, and YouTube for YouTube, and Facebook for Facebook.
Width and Height of Source
We generally recommend setting the size to 1920 wide and 1080 tall (more height is recommended if using messages), however, depending on your stream adjust the size here may work better for you. If you need to scale down, you can do so directly inside of OBS Studio. If you’re using the Streamlabs OBS .overlay file, you may not need to complete this step if your alert box is already added in.
Settings

- Timer (Minutes) - This time is to adjust the amount of time the train timer is displayed.
Progress Bar Options
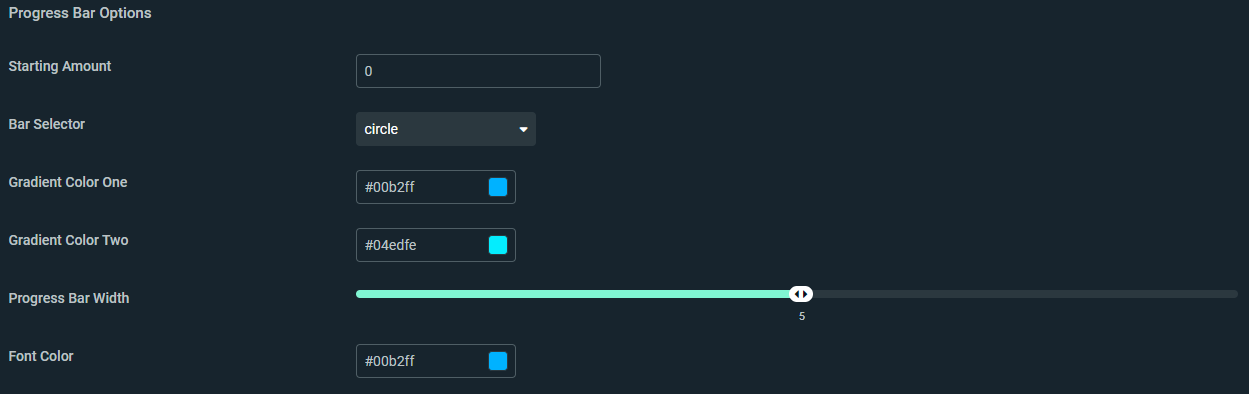
- Starting Amount - Normally the counter will start from 0. It will go up one number each event you have. (Example: 1 Follower and 5 Gifted subs would give you 6)
- Bar Selector - You will have 3 different timers to choose from. Circle, Square, and Polystar
- Gradient Color One - This will adjust one half of the timer color.
- Gradient Color Two - This will adjust one half of the timer color.
- Progress Bar Width - Adjust the thickness of the timer bar.
- Font Color - Change of the color of the event number text
Font Options
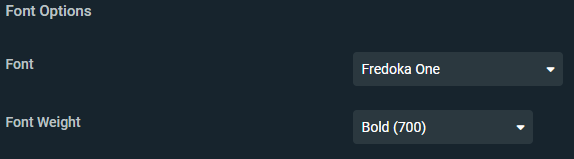
- Font - This font adjustment will control all of the fonts on the alert
- Font Weight - Adjust the font weight of the text.
Alert Text Options
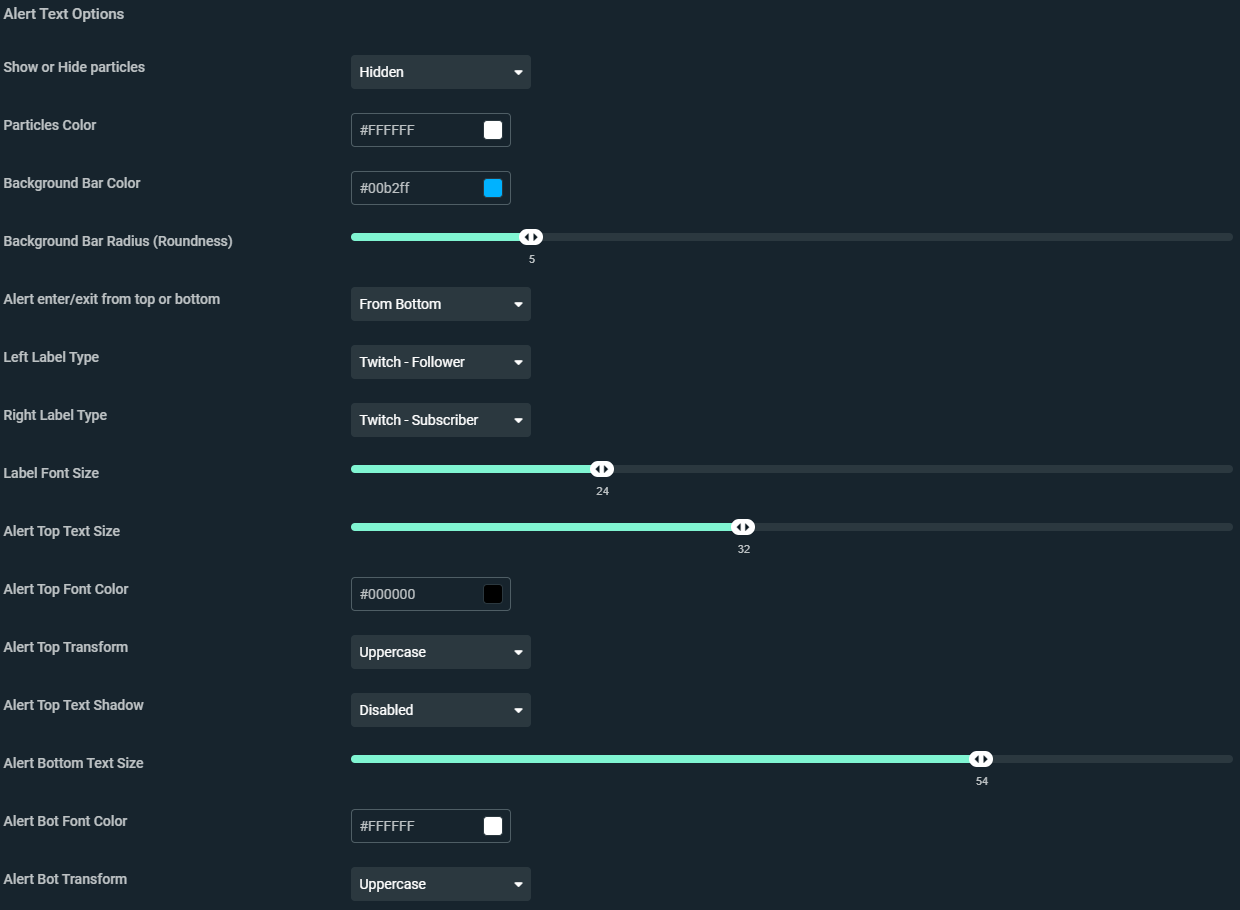
- Show or Hide Particles - This option will show or hide the particle animation on the top text bar (Hidden by default).
- Particles Color - Adjust the color the particles when enabled.
- Background Bar Color - Adjust the color the background bar on the top text.
- Background Bar Radius - Adjusts the roundness of the corners on the background bar.
- Alert enter/exit from top or bottom - This option will control where the alert is display from. Top will display the alert above the widget and bottom will display it below.
- Left Label Type - Select the event type to be shown on the left side of the widget.
- Right Label Type - Select the event type to be shown on the right side of the widget.
- Label Font Size - This will adjust the font size for the labels on the left and right side.
- Alert Top Text Size - Adjust the font size on the top part of the alert (Example: New Follower).
- Alert Top Color - Adjust the font color on the top part of the alert.
- Alert Top Transform - Normal will display the text normally. Uppercase will force the text to be uppercase.
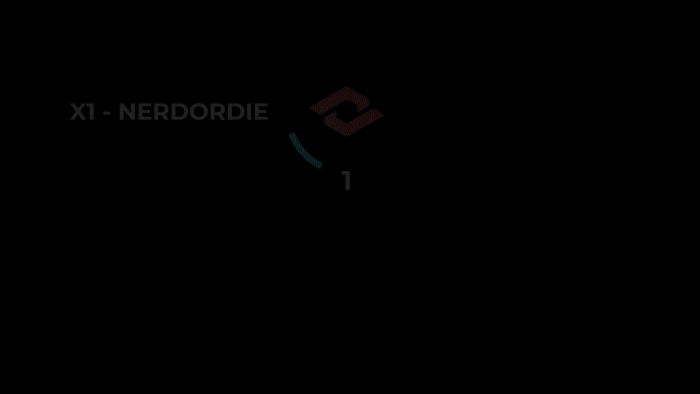
- Alert Bot Text Size - Adjust the font size on the top part of the alert (Example: Nerd Or Die).
- Alert Bot Color - Adjust the font color on the bottom part of the alert.
- Alert Bot Transform - Normal will display the text normally. Uppercase will force the text to be uppercase.
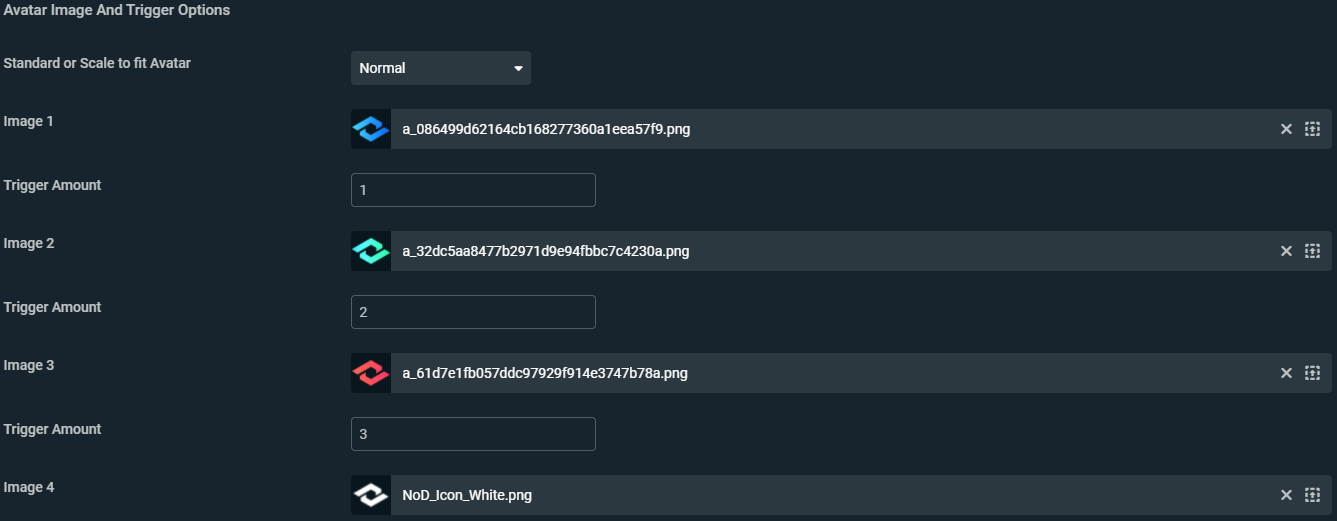
Avatar Image And Trigger Options
Warning
Images MUST be a .png or .gif (video files are not currently supported)
- Standard or Scale to fit Avatar - (Normal) will leave the image untouched. (Scale to fit) will slightly make the image larger than the timer, but mask it.
- Image 1 - This will be your main image. This image will be displayed from the beginning. Also, even the event timer reaches 0. It will revert back to this image.
- Trigger Amount - This will be the number in which the second image is triggered.
- Image 2 - Once the trigger amount is reached. This image will be displayed.
- Trigger Amount - This will be the number in which the third image is triggered.
- Image 3 - Once the trigger amount is reached. This image will be displayed.
- Trigger Amount - This will be the number in which the fourth image is triggered.
- Image 4 - Once the trigger amount is reached. This image will be displayed.
Alert Sound Options

- Alert Volume - Adjust the volume of the alert.
- Alert Sound - This is where you will add your own alert sound.
Updated
Comments
0 comments
Please sign in to leave a comment.